The Art of Transformation: A Comprehensive Guide to Step-by-Step Makeup Application
Related Articles: The Art of Transformation: A Comprehensive Guide to Step-by-Step Makeup Application
Introduction
With great pleasure, we will explore the intriguing topic related to The Art of Transformation: A Comprehensive Guide to Step-by-Step Makeup Application. Let’s weave interesting information and offer fresh perspectives to the readers.
Table of Content
The Art of Transformation: A Comprehensive Guide to Step-by-Step Makeup Application
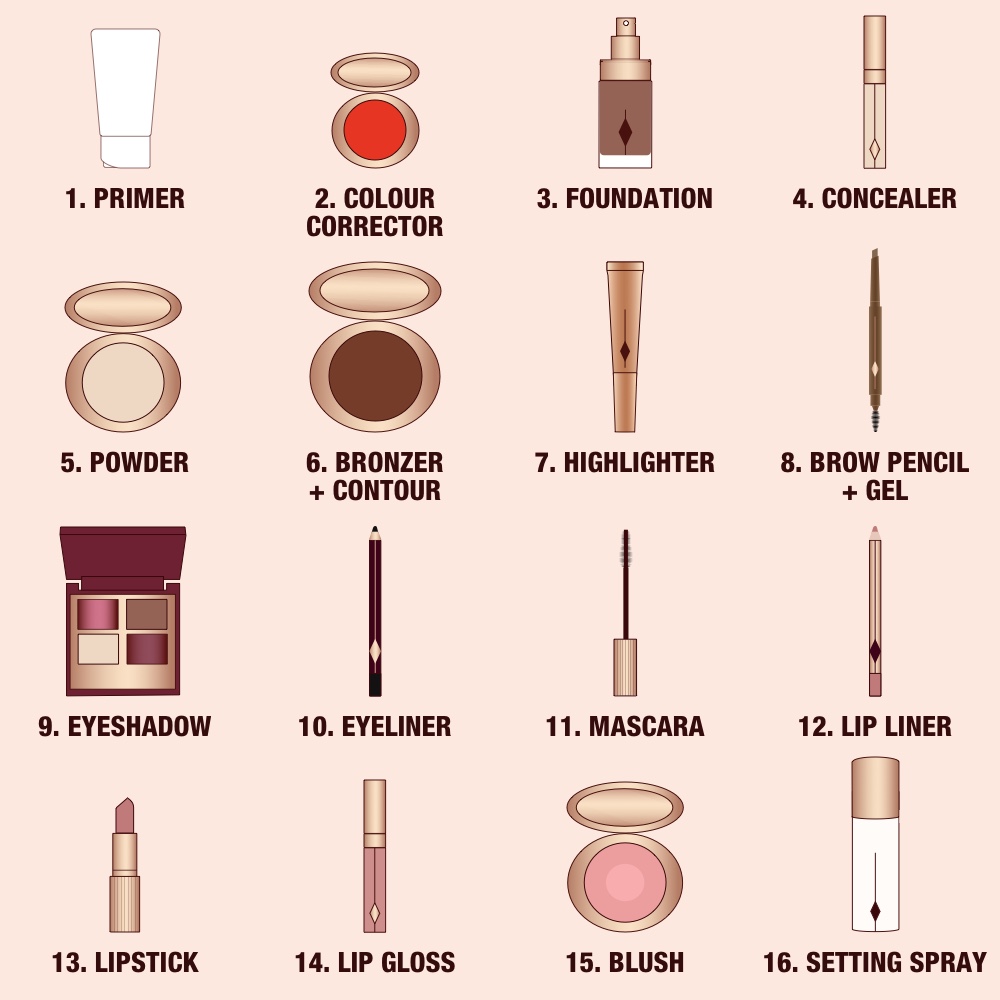
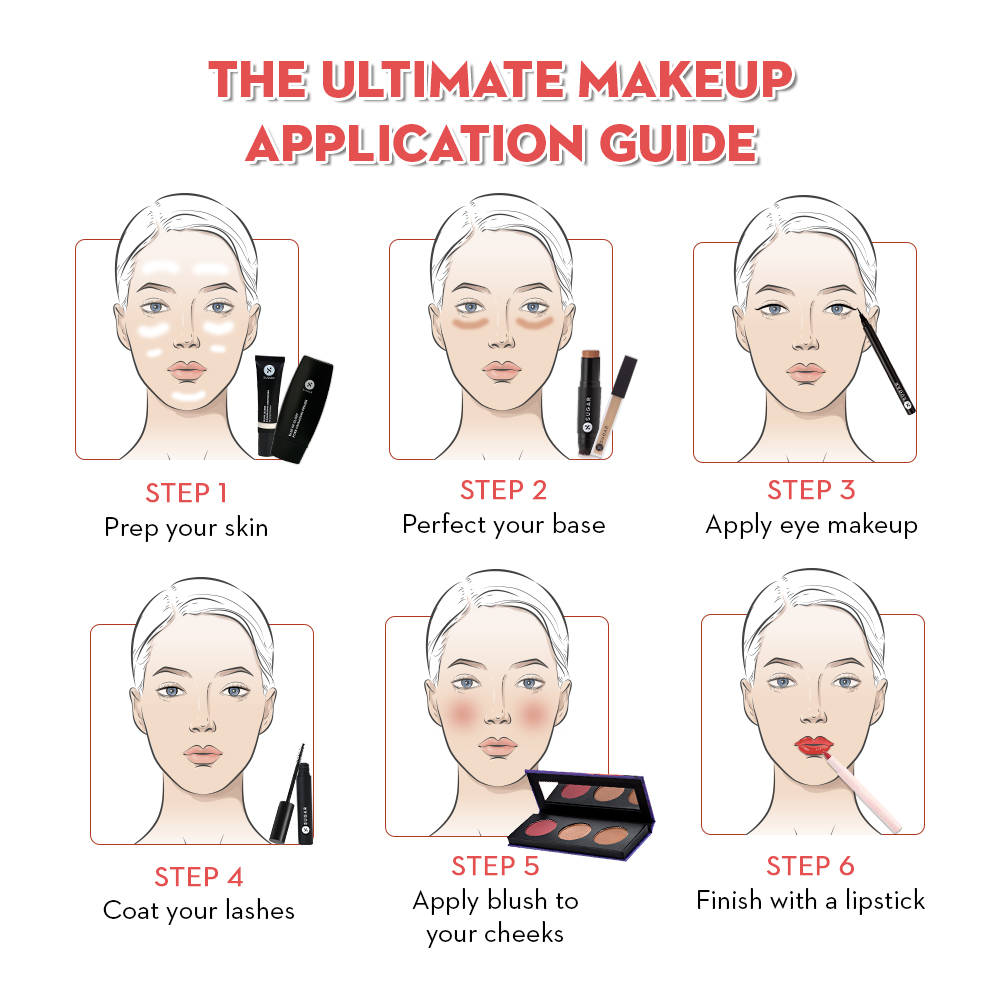
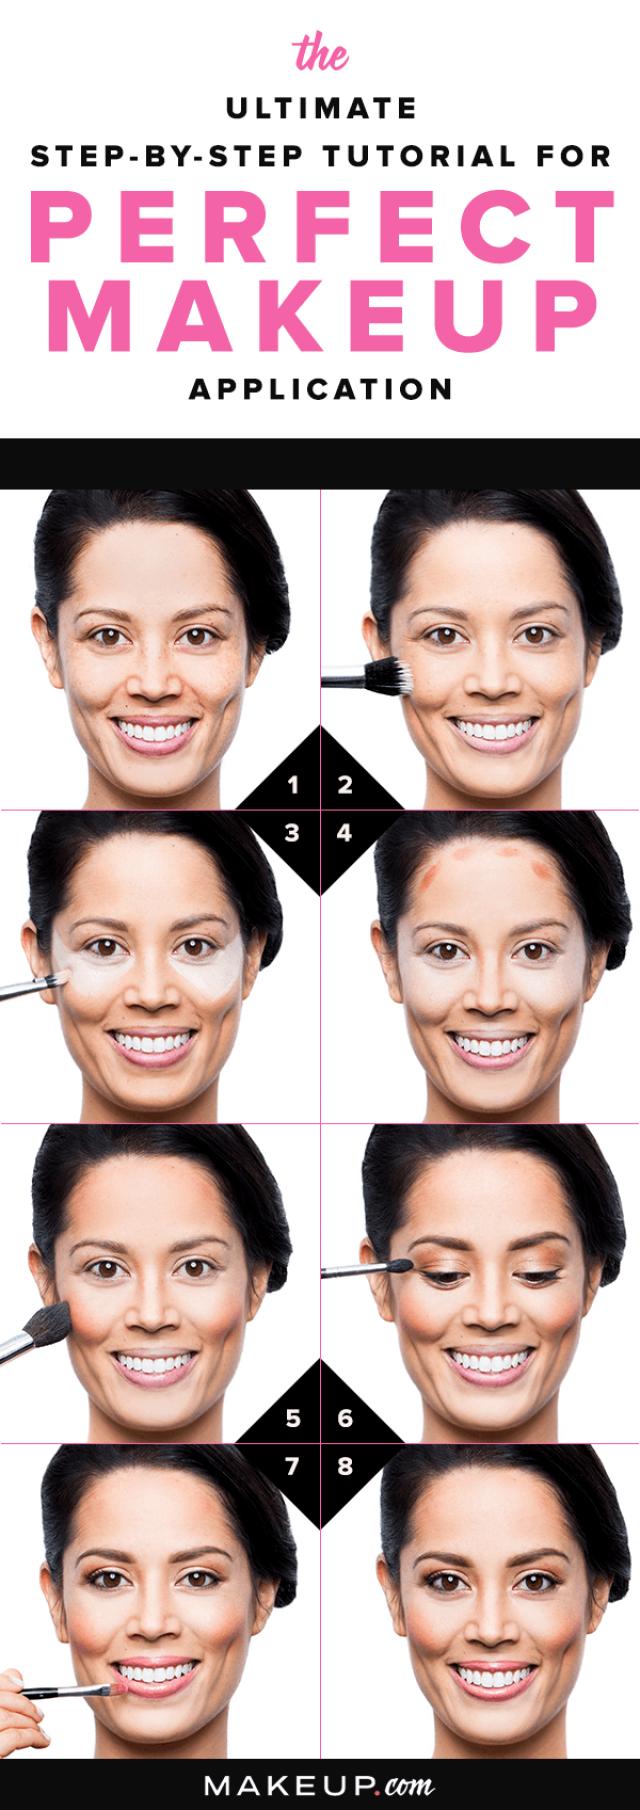
Makeup, a transformative art form, has the power to enhance natural features, express creativity, and boost confidence. Understanding the nuances of makeup application can unlock a world of possibilities, allowing individuals to achieve desired looks, from subtle enhancements to bold statements. This comprehensive guide delves into the essential steps of makeup application, providing a detailed roadmap for achieving flawless results.
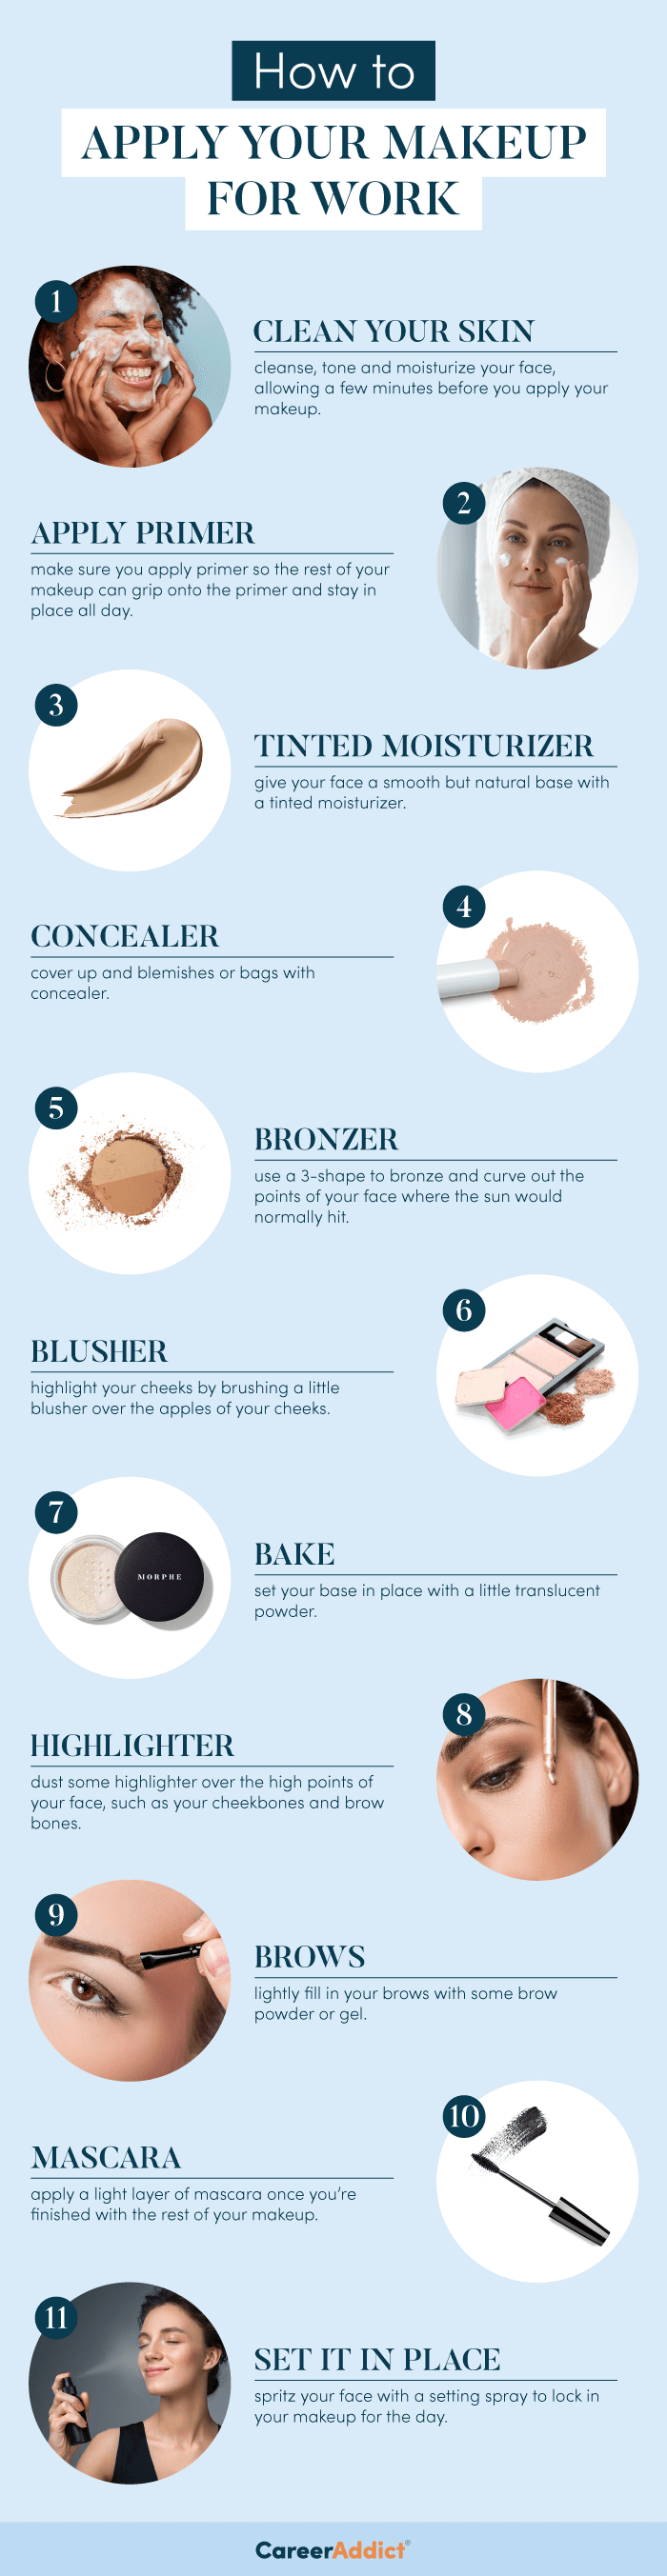
Step 1: Preparation – The Foundation of Flawless Makeup
Before embarking on the artistry of makeup, proper preparation is paramount. This crucial step sets the stage for a smooth and long-lasting application.
- Cleanse and Exfoliate: Start by cleansing the face with a gentle cleanser, removing any dirt, oil, or makeup residue. Exfoliating once or twice a week removes dead skin cells, revealing a fresh canvas for makeup application.
- Moisturize: Applying a moisturizer appropriate for your skin type is essential for hydration and a smooth texture. Allow the moisturizer to fully absorb before proceeding to the next step.
- Primer: A primer acts as a barrier between skin and makeup, creating a smooth surface for even application and extending the wear of makeup. Choose a primer that addresses specific concerns, such as blurring pores, controlling shine, or enhancing luminosity.
Step 2: Foundation – The Canvas of Your Look
Foundation is the backbone of any makeup look, unifying skin tone and providing a blank canvas for further artistry.
- Choosing the Right Foundation: Selecting the correct foundation shade is crucial for achieving a natural and seamless finish. Test foundation shades on your jawline in natural light to find the perfect match.
- Application Technique: Apply foundation with a foundation brush, beauty blender, or your fingertips, blending it evenly across the face and down the neck for a natural transition.
- Coverage Levels: Foundation comes in varying coverage levels, from sheer to full coverage. Choose the level of coverage that best suits your needs and desired finish.
- Setting Foundation: Applying a translucent powder over foundation sets it in place, preventing creasing and extending its wear.
Step 3: Concealer – Addressing Imperfections
Concealer is a powerful tool for camouflaging blemishes, dark circles, and other imperfections, enhancing the overall clarity of the complexion.
- Choosing the Right Concealer: Opt for a concealer shade slightly lighter than your foundation to brighten and conceal effectively.
- Application Technique: Apply concealer strategically to targeted areas, using a small brush or a concealer brush. Blend carefully with a damp beauty blender or a concealer brush for a seamless finish.
- Setting Concealer: Set concealer with a translucent powder to prevent creasing and maintain its effectiveness throughout the day.
Step 4: Eyeshadow – Defining and Enhancing the Eyes
Eyeshadow is a versatile tool for defining the eyes, adding depth, and creating a range of looks.
- Choosing Eyeshadow Palettes: Explore various eyeshadow palettes with diverse shades and textures to suit different occasions and personal preferences.
- Applying Eyeshadow: Use eyeshadow brushes to apply eyeshadow in a smooth and controlled manner. Blend seamlessly for a natural finish.
- Creating Depth and Dimension: Use lighter shades on the brow bone and inner corner of the eye to brighten and open up the eye. Apply darker shades in the crease and outer corner for depth and definition.
Step 5: Eyeliner – Defining the Eye Contour
Eyeliner is a versatile tool for enhancing the shape of the eye, creating a more defined look and adding drama.
- Choosing Eyeliner: Opt for a liquid eyeliner for precise lines, a gel eyeliner for a more smudged look, or a pencil eyeliner for a softer definition.
- Application Technique: Apply eyeliner along the lash line, starting from the inner corner and extending outward. For a more dramatic look, consider winged eyeliner.
- Smudging and Blending: Use a smudging brush to soften the lines of pencil eyeliner or create a smoky eye effect.
Step 6: Mascara – Amplifying Lash Volume
Mascara is the finishing touch for the eyes, amplifying lash volume and creating a more dramatic look.
- Choosing Mascara: Select a mascara that addresses your specific needs, such as volume, length, or curl.
- Application Technique: Apply mascara from the root of the lashes, wiggling the wand to coat each lash thoroughly. Avoid clumping by wiping off excess mascara on the wand.
- Multiple Coats: Apply multiple coats of mascara for added volume and definition.
Step 7: Brows – Framing the Face
Well-defined brows frame the face, enhancing facial symmetry and adding a polished touch to any makeup look.
- Grooming the Brows: Use a brow brush to brush brows into place and remove any stray hairs.
- Filling in the Brows: Use a brow pencil, powder, or pomade to fill in sparse areas and define the brow shape. Choose a shade that closely matches your natural brow color.
- Setting the Brows: Use a brow gel to set brows in place, preventing them from smudging or fading throughout the day.
Step 8: Blush – Adding a Flush of Color
Blush adds a natural flush of color to the cheeks, enhancing a youthful glow and bringing warmth to the complexion.
- Choosing Blush: Opt for a blush shade that complements your skin tone and desired effect. Peach and pink shades are universally flattering.
- Application Technique: Apply blush to the apples of the cheeks, blending it upward towards the temples for a natural, diffused effect.
- Blush Placement: Experiment with blush placement to achieve different looks. Applying blush higher on the cheekbones can create a lifted effect.
Step 9: Highlighter – Emphasizing Features
Highlighter illuminates and enhances features, adding dimension and a radiant glow to the complexion.
- Choosing Highlighter: Select a highlighter with a subtle shimmer or a more dramatic glow, depending on your desired effect.
- Application Technique: Apply highlighter to the high points of the face, such as the cheekbones, brow bones, and cupid’s bow. Blend seamlessly for a natural glow.
- Highlighter Placement: Experiment with highlighter placement to accentuate specific features. Applying highlighter to the inner corner of the eyes can create a wide-eyed effect.
Step 10: Lipstick – The Finishing Touch
Lipstick is the final touch that completes any makeup look, adding color and definition to the lips.
- Choosing Lipstick: Select a lipstick shade that complements your skin tone and desired look. From bold reds to soft nudes, there is a lipstick shade for every occasion.
- Application Technique: Apply lipstick using a lip brush for precise application or directly from the bullet for a more casual look.
- Lip Liner: Use a lip liner to define the lip shape and prevent lipstick from bleeding. Choose a lip liner shade that matches or complements the lipstick shade.
FAQs about Step-by-Step Makeup
Q: What are the essential tools for applying makeup?
A: Essential tools include brushes for foundation, concealer, eyeshadow, blush, and lipstick. Other helpful tools include a beauty blender for blending, a brow brush, and a brow gel.
Q: How do I choose the right shade of foundation?
A: Test foundation shades on your jawline in natural light. The shade that disappears into your skin is the correct match.
Q: How do I apply foundation evenly?
A: Use a foundation brush, beauty blender, or your fingertips to blend foundation evenly across the face and down the neck.
Q: How do I prevent makeup from creasing?
A: Set foundation and concealer with a translucent powder to prevent creasing and extend their wear.
Q: How do I create a smoky eye look?
A: Use a dark eyeshadow shade on the crease and outer corner of the eye, blending it upwards and outwards for a smoky effect.
Q: How do I make my lips look fuller?
A: Use a lip liner to overline the natural lip shape slightly, creating the illusion of fuller lips.
Tips for Step-by-Step Makeup Application
- Practice makes perfect: The more you practice, the more confident and skilled you will become with makeup application.
- Start with a clean canvas: Always cleanse and moisturize your skin before applying makeup.
- Less is more: It’s better to start with a light application and build up coverage as needed.
- Blend, blend, blend: Seamless blending is key to achieving a natural and flawless finish.
- Experiment with different looks: Have fun with makeup and explore different styles and trends.
Conclusion
Mastering the art of step-by-step makeup application is a journey of self-expression and creativity. By following these detailed steps and incorporating valuable tips, individuals can unlock their inner artist and achieve flawless, confident looks for any occasion. Remember, makeup is a tool for enhancement, not concealment. Embrace your natural beauty and use makeup to accentuate your unique features. The world of makeup awaits, offering endless possibilities for transformation and self-discovery.


Closure
Thus, we hope this article has provided valuable insights into The Art of Transformation: A Comprehensive Guide to Step-by-Step Makeup Application. We appreciate your attention to our article. See you in our next article!