Mastering the Art of Application: A Comprehensive Guide to Makeup Tools
Related Articles: Mastering the Art of Application: A Comprehensive Guide to Makeup Tools
Introduction
With great pleasure, we will explore the intriguing topic related to Mastering the Art of Application: A Comprehensive Guide to Makeup Tools. Let’s weave interesting information and offer fresh perspectives to the readers.
Table of Content
- 1 Related Articles: Mastering the Art of Application: A Comprehensive Guide to Makeup Tools
- 2 Introduction
- 3 Mastering the Art of Application: A Comprehensive Guide to Makeup Tools
- 3.1 Brushes: The Foundation of Makeup Application
- 3.2 Sponges: The Blending Powerhouse
- 3.3 Applicators: Precision and Versatility
- 3.4 Tools for the Eyes: Enhancing Beauty
- 3.5 Tools for the Lips: Defining Beauty
- 3.6 Conclusion: The Power of the Right Tools
- 4 Closure
Mastering the Art of Application: A Comprehensive Guide to Makeup Tools
The world of makeup tools is vast and diverse, offering a range of options to cater to every skill level and desired outcome. Understanding the nuances of each tool and its application is crucial to achieving a flawless and professional makeup look. This comprehensive guide delves into the different types of makeup tools, their unique benefits, and how to best utilize them for a polished and confident finish.
Brushes: The Foundation of Makeup Application
Brushes are the cornerstone of any makeup kit, offering versatility and precision in applying various products. Their diverse shapes and sizes cater to specific areas of the face and product types, ensuring a seamless and natural-looking application.
Types of Brushes:
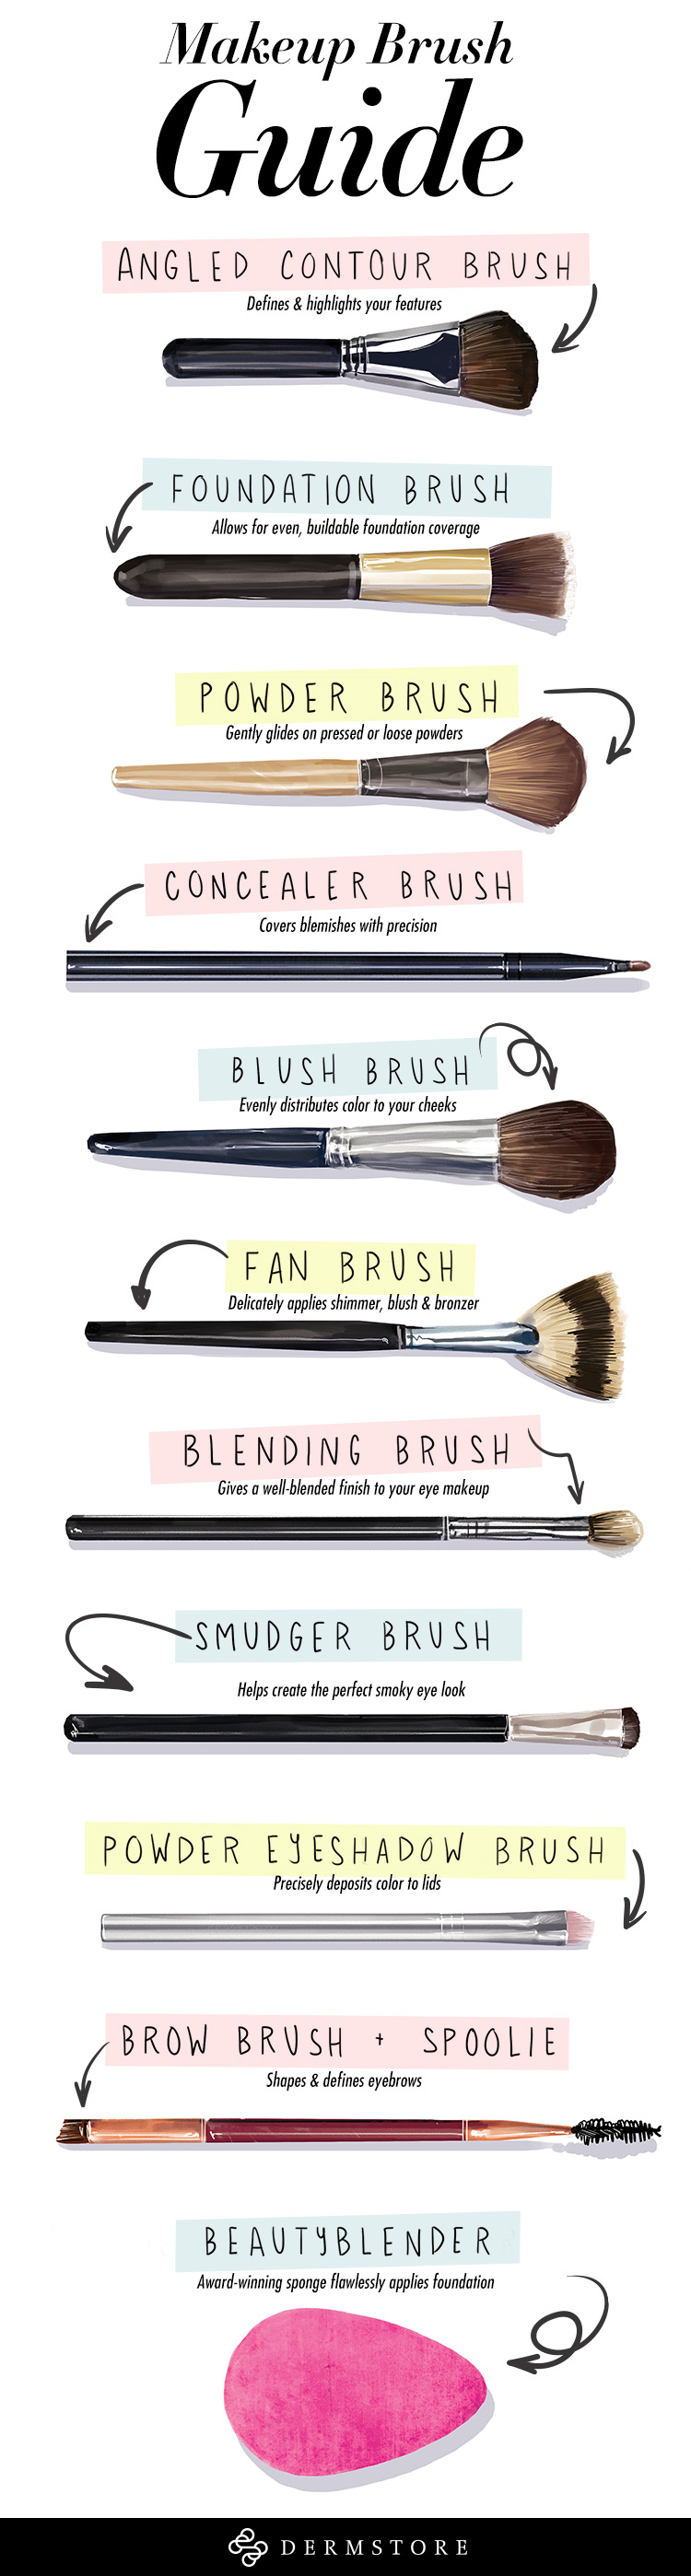
- Foundation Brush: Designed for applying foundation evenly and seamlessly. Flat, dense brushes, such as the flat top or stippling brush, provide a smooth and blended finish.
- Concealer Brush: Smaller, pointed brushes, like the angled brush or concealer brush, are ideal for concealing blemishes and imperfections. Their precise shape allows for targeted application.
- Powder Brush: Large, fluffy brushes, such as the powder brush or kabuki brush, are perfect for setting makeup with powder and achieving a soft, diffused finish.
- Blush Brush: Angled or rounded brushes, like the blush brush or contour brush, are used for applying blush and bronzer to the cheeks and contouring the face.
- Eyeshadow Brush: Available in various shapes and sizes, eyeshadow brushes are essential for blending, shading, and highlighting the eyes. Examples include blending brushes, crease brushes, and flat shader brushes.
- Eyeliner Brush: Fine-tipped brushes, like the eyeliner brush or angled liner brush, are designed for precise application of eyeliner and creating sharp lines.
- Lip Brush: A small, angled brush, the lip brush, offers precise application of lipstick and helps define the lip shape.
Benefits of Using Brushes:
- Precision and Control: Brushes allow for precise application of makeup, ensuring that products are applied exactly where intended.
- Seamless Blending: The bristles of brushes blend makeup seamlessly, creating a natural and flawless finish.
- Hygienic Application: Brushes can be easily cleaned and sanitized, promoting hygiene and preventing product contamination.
FAQs:
- How often should brushes be cleaned? Brushes should be cleaned at least once a week to prevent the buildup of bacteria and product residue.
- What is the best way to clean brushes? Use a mild brush cleanser or baby shampoo and warm water. Gently swirl the brush head in the solution and rinse thoroughly.
- How to store brushes? Store brushes upright in a brush holder or on a drying rack to maintain their shape and prevent damage.
Tips:
- Use different brushes for different products. Avoid using the same brush for multiple products to prevent cross-contamination and maintain product integrity.
- Choose the right brush size for the desired effect. A larger brush is suitable for blending foundation, while a smaller brush is better for applying concealer or eyeshadow.
- Practice with different brush strokes. Experiment with different brush strokes to find the techniques that work best for your desired look.
Sponges: The Blending Powerhouse
Makeup sponges are versatile tools that provide a seamless and airbrushed finish. Their soft, absorbent texture allows for effortless blending and product application.
Types of Sponges:
- Beauty Blender: A teardrop-shaped sponge known for its ability to blend foundation and concealer seamlessly, creating a flawless and airbrushed finish.
- Wedge Sponge: A flat, triangular sponge, the wedge sponge is ideal for blending foundation, contouring, and applying blush.
- Round Sponge: A classic round sponge, often used for applying foundation and blending products.
Benefits of Using Sponges:
- Effortless Blending: Sponges provide a smooth and even application, seamlessly blending makeup for a natural and flawless finish.
- Versatile Application: Sponges can be used to apply various products, including foundation, concealer, blush, and powder.
- Damp Application: Dampening the sponge before use allows for a more even and natural application, as it absorbs less product.
FAQs:
- How to clean a makeup sponge? Rinse the sponge with mild soap and warm water, squeezing out excess water. Allow it to air dry completely.
- How often should a sponge be replaced? Sponges should be replaced every 2-3 months to maintain hygiene and prevent the buildup of bacteria.
- What is the best way to use a sponge? Dampen the sponge slightly before use and bounce it onto the skin, rather than dragging it across the surface.
Tips:
- Use a damp sponge for a more natural finish. A damp sponge helps to create a seamless and airbrushed look, blending makeup effortlessly.
- Use a dry sponge for a more pigmented application. A dry sponge absorbs less product, resulting in a more pigmented and opaque finish.
- Cut the sponge in half for more precise application. Cutting the sponge in half creates a smaller surface area, making it easier to apply makeup in specific areas, like the eyes or nose.
Applicators: Precision and Versatility
Applicators are small, specialized tools that are designed for specific tasks, offering precision and control in makeup application.
Types of Applicators:
- Eyeliner Applicator: A thin, pointed applicator, the eyeliner applicator, is used for applying liquid or gel eyeliner, creating precise lines and defining the eye shape.
- Mascara Wand: A wand with bristles, the mascara wand, is used to apply mascara to the eyelashes, lengthening and volumizing them.
- Lip Applicator: A small, pointed applicator, the lip applicator, is used for applying lipstick and gloss, ensuring precise application and smooth lines.
- Spoolie: A small, brush-like applicator, the spoolie, is used to brush out eyelashes, separating and defining them.
- Q-Tip: A small, cotton swab, the Q-tip, is used for cleaning up mistakes, applying products with precision, and blending edges.
Benefits of Using Applicators:
- Precision and Control: Applicators offer precise application, allowing for controlled application of products in specific areas.
- Specific Functions: Each applicator is designed for a specific purpose, ensuring optimal results for the intended task.
- Easy to Clean and Sanitize: Most applicators are easily cleaned and sanitized, promoting hygiene and preventing product contamination.
FAQs:
- How to clean eyeliner applicators? Clean eyeliner applicators with rubbing alcohol or a mild soap and water solution.
- How to clean mascara wands? Mascara wands should be cleaned regularly with a gentle soap and water solution to prevent the buildup of product residue.
- How to clean spoolies? Spoolies can be cleaned with a mild soap and water solution or a brush cleaner.
Tips:
- Use a clean applicator for each product. Avoid using the same applicator for multiple products to prevent cross-contamination and maintain product integrity.
- Replace applicators regularly. Applicators should be replaced every 2-3 months to ensure proper function and prevent the buildup of bacteria.
- Use Q-tips for precise application and cleaning up mistakes. Q-tips are versatile tools that can be used for various tasks, from applying concealer to cleaning up smudges.
Tools for the Eyes: Enhancing Beauty
The eyes are the window to the soul, and the right tools can help enhance their natural beauty. These specialized tools are designed for precise application and blending, creating captivating eye looks.
Types of Tools:
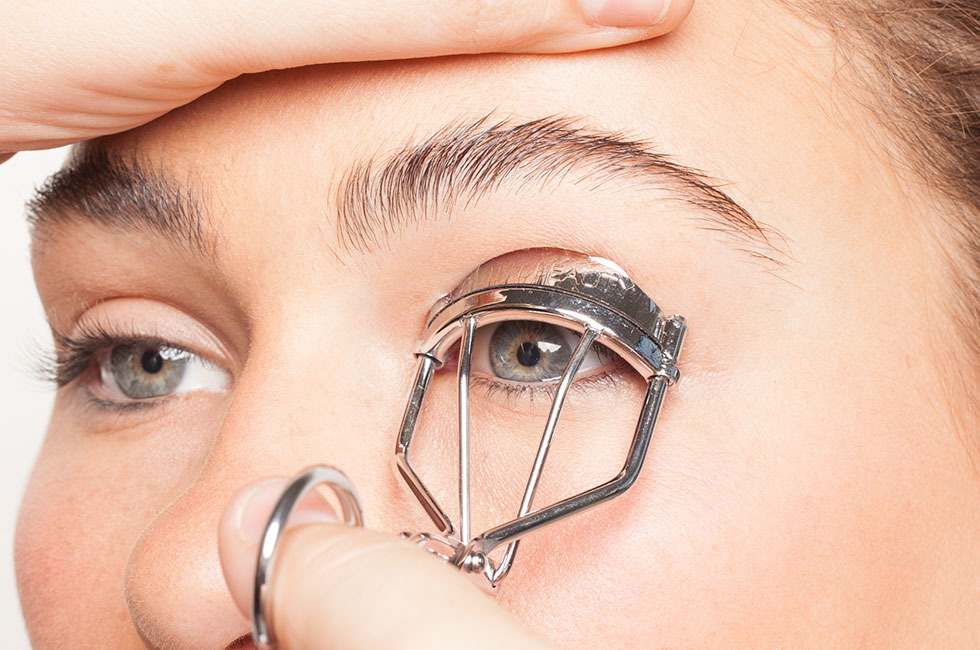
- Eyelash Curler: A tool with a curved clamp, the eyelash curler, is used to curl and lift eyelashes, creating a more open and defined eye shape.
- Eyebrow Brush: A small, angled brush, the eyebrow brush, is used to shape, define, and blend eyebrow products, creating natural-looking brows.
- Eyebrow Pencil: A pencil with a fine tip, the eyebrow pencil, is used to fill in sparse brows, define the eyebrow shape, and create a natural-looking arch.
- Eyebrow Spoolie: A small, brush-like applicator, the eyebrow spoolie, is used to brush out eyebrows, separating and defining them.
Benefits of Using Eye Tools:
- Enhanced Eye Shape: Eye tools, like the eyelash curler and eyebrow brush, help to define and enhance the natural eye shape, creating a more captivating and youthful look.
- Precise Application: Tools like eyebrow pencils and eyebrow spoolies allow for precise application of products, creating natural-looking brows and enhancing the eye area.
- Easy to Clean and Sanitize: Most eye tools are easily cleaned and sanitized, promoting hygiene and preventing product contamination.
FAQs:
- How to use an eyelash curler? Gently clamp the curler at the base of the eyelashes and hold for a few seconds. Repeat this process several times to create a more dramatic curl.
- How to clean an eyebrow brush? Clean the eyebrow brush with a mild soap and water solution or a brush cleaner.
- How to sharpen an eyebrow pencil? Use a sharpener specifically designed for eyebrow pencils.
Tips:
- Use a lash curler before applying mascara. Curling eyelashes before applying mascara will create a more lifted and dramatic look.
- Use an eyebrow brush to blend and shape eyebrow products. Blending eyebrow products with a brush creates a more natural and seamless look.
- Choose an eyebrow pencil that matches your hair color. Matching the eyebrow pencil to your hair color will create a more natural and harmonious look.
Tools for the Lips: Defining Beauty
The lips are a focal point of the face, and the right tools can help define their shape and enhance their color. These specialized tools ensure precise application and a flawless finish.
Types of Tools:
- Lip Liner: A pencil with a fine tip, the lip liner, is used to define the lip shape, prevent lipstick from bleeding, and create a more defined and polished look.
- Lip Brush: A small, angled brush, the lip brush, offers precise application of lipstick and helps define the lip shape.
- Lip Scrub: A gentle exfoliating product, the lip scrub, helps to remove dead skin cells and create a smooth canvas for lipstick application.
Benefits of Using Lip Tools:
- Defined Lip Shape: Lip tools, like lip liners and lip brushes, help to define the lip shape, creating a more polished and symmetrical look.
- Precise Application: Lip tools allow for precise application of lipstick, ensuring that the product is applied evenly and without bleeding.
- Enhanced Lip Color: Lip tools, like lip scrubs, help to create a smooth canvas for lipstick application, enhancing the color payoff and longevity of the product.
FAQs:
- How to use a lip liner? Line the lips with a lip liner that matches the lipstick color. Use short, precise strokes to create a defined shape.
- How to use a lip brush? Dip the lip brush into the lipstick and apply it to the lips, starting from the center and working outward.
- How often should you use a lip scrub? Use a lip scrub 1-2 times a week to remove dead skin cells and create a smooth canvas for lipstick application.
Tips:
- Use a lip liner to prevent lipstick from bleeding. Lining the lips with a lip liner will help to create a barrier, preventing lipstick from bleeding outside the lip line.
- Use a lip brush for a more precise and even application. A lip brush allows for controlled application of lipstick, ensuring an even and polished finish.
- Exfoliate lips before applying lipstick. Exfoliating lips will remove dead skin cells and create a smooth canvas for lipstick application, enhancing the color payoff and longevity of the product.
Conclusion: The Power of the Right Tools
The right makeup tools are essential for achieving a flawless and professional makeup look. From brushes and sponges to applicators and specialized eye and lip tools, each tool serves a unique purpose, offering precision, control, and versatility in application. Understanding the benefits and proper usage of each tool empowers you to create stunning looks, enhancing your natural beauty and boosting your confidence. Embrace the power of the right tools, and unlock your full potential in the art of makeup.


Closure
Thus, we hope this article has provided valuable insights into Mastering the Art of Application: A Comprehensive Guide to Makeup Tools. We thank you for taking the time to read this article. See you in our next article!